
here’s my latest masterpiece… err, well, really more of an experimental, proof of concept piece than a so-called “masterpiece”. there are some places where this could be better and i could continue to refine this though i’ve decided to leave it as it is. technically, there are a few errors due to buggy software [adobe photoshop, ffmpeg, and quicktime player pro all seemed unable to support the size of this project.. it was 18361 still images with the final tiff files taking over a terabyte of space before rendering the 4k uhd 2160p video], colors could be improved, the time-lapse film/movie/video could be edited down to something shorter, some of the little planets could be centered better, etc, etc, though part of the concept behind all of my work is to expand perspectives [and after working on putting this together for weeks, i’m finally calling it done, at least for now]. so many of us seek perfection, especially technical perfection in the photographic, or lens-based arts, and yes very beautiful works can be created with enough effort, though this same quest for perfection can drive one insane and keep pushing one further into the mind, and the mind’s desire/need for perfection (or need for more/better/newer/faster/etc). the underlying message in my work is to let go of one’s own self-limitations. let go of what no longer serves you. expand your mind, your viewpoint, your self, to new limits. when letting go of the limitations of the mind, one will discover a whole new reality in this experience called life. one will discover a deep sense of peace amidst the chaos. life truly happens outside of the mind and its attachments/desires. step outside of yourself. expand your way of seeing the world, your self, others, and life to a new level. there is beauty everywhere, we just need to learn to see it. and it’s done by letting go rather than struggling, striving, and yearning for more and more. when letting go, inspiration easily comes to you. in this place of silence, from a deeper place of silence, ideas and feelings emerge.
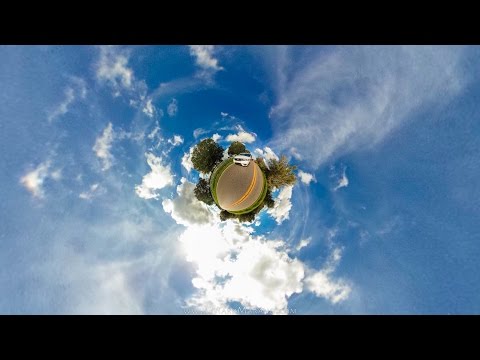
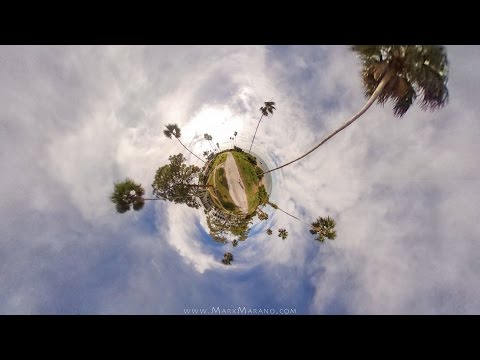
just like the idea for this. i don’t recall exactly where it all started, though many years ago when i first created little planet time-lapses (which, at the time, had never been done before), i thought taking it to the next level.. it’d be neat to see them in motion — where the camera actually moves physical positions, not just virtually altering the perspective of the little planet time-lapse video as i had done. i shot at least a couple with my old rig years ago (that i never completed), and now with newer technology, a year ago i was able to create an aerial 360×180 degree little planet time-lapse in motion by hanging a ricoh theta camera off of a kite and walking for miles with it at honeymoon island. back in 2014, i had shot little planets with the ricoh theta suction cup mounted to the moonroof of a car, or holding it up on a monopod out the window while driving (at very low speeds). however in most of these shots, the car took up too much of the frame. i knew that elevating the camera higher would make the car smaller in the frame/planet though didn’t have a safe means to do so. somehow the idea came to me to get a short extension to make the camera sit higher above the suction cup [it’s funny how this happens as i don’t recall exactly what i was looking for, though inspiration, or divine guidance sometimes, takes us on these long tangents and you seemingly ‘randomly’ stumble upon something that triggers something else and then an idea comes which leads to another, etc, etc, and you end up creating what you’re creating]. anyhow, that first attempt still didn’t give me what i was looking for so i ended up researching and creating the rig that let me do the shots where it looks like you’re looking straight down on the car from a bird’s eye view as its driving on the little planet. there were a number of unknowns in doing so as this is something that i don’t think has ever been done before. [it’s funny as this is where the ego/mind would want to shout out that it was the first one to think of or create something new, unique, or to a further extreme/record, though there’s really a higher and more important message here] i’ve never seen this specific look done nor heard of anyone mounting a camera so high above a moving car (except with a large custom fabricated system like on the google maps car that’s likely quite expensive). sometimes you’ve got to just trust where life is taking you. my car is still pretty new and i didn’t want any part of the rig to come undone while driving and cause damage, though by learning to listen to and trust one’s intuition or inspiration (and perhaps balanced with a bit of logic and analysis in research and development), one can invent new things and take one’s art to a new level. when i was determining what gear i was getting to create the car rig, the idea came to me of using the components in a different manner to get the shots where you see the front of the car (from a lower angle) driving on the little planet. [and the idea of the car driving around the planet came to me a long time ago.. though at the time i would’ve had to shoot it as a time-lapse (and either push the car or drive and stop for one frame of the shot every 5 seconds) before getting the camera that was able to shoot it as a video now. i’m grateful for technology continuing to expand and make creating images with specific looks much simpler]
things don’t have to be so complex either. start small, or work in small increments, and you can do something big. with the car rig shots, i drove quite slow during the first shots (both to make sure the rig held up before incrementally driving a little faster with it, and to have more shots in the time-lapse as the minimum interval timer setting available on the camera was not ideal). a lot of this is common sense and one who has done something similar before will see this as a simple, effective, logical way to approach creating something, though i realize, and have seen, that not everyone thinks of this sort of technical approach when creating something or trying something new. it really seems to be about a balance between feeling and thinking, between inspiration and logic, just like photography is a balance between science and art — one could get by with either approach, though when combining both, one can create (and live) in new ways.
this balance, or way of understanding both/all sides, is part of the whole underlying message of expanding perspectives. by being able to see, understand, and feel one way or the other, one can remove limitations in one’s life. spiritually, or philosophically (or whatever you want to call it) looking at this, it’s more of a non-dualistic approach. as we learn to transcend the limitations of duality, we embrace oneness. in oneness, we see that everything is connected and there is no right or wrong, no good or bad, and no separation. everything is part of the whole, and needs to exist in order for us to have this experience we call life. without up we cannot know what down is. without good or something we desire, we cannot know what bad or something we resist is. these dualistic perspectives give us the ability to experience life from a single viewpoint or perspective of separation, though as we learn to understand the whole, and see everything/everyone as connected and somehow related to everything/everyone else, new doors of perception will open to us. our current understanding through a vantage point of duality, is caused by existing and perceiving through the limitations of the mind. as we awaken and transcend the limitations of the mind, we begin to see the world as it is — before awakening, when perceiving through the mind, we are seeing a filtered world — we are not seeing it as it is — our viewpoint is clouded by programming/conditioning/judgment that we have been taught since we entered this world. we are told this is where we begin and this is where we end — anything outside of this defined endpoint is not us or ours, and anything within is us or ours. separation and conditioning is taught. the separate self, the ego, is a learned concept. yes, it is part of our current human experience, though it is also the root cause of all suffering. when we learn to see that we are all one, our lives will heal. we’ll also begin to see that there is no past or future.. these are merely concepts the separate mind has been creating. some concepts can serve us in various ways though many limit us. as we realize none of what we thought was real actually is real, we can much more easily let go of any attachment and suffering. we’ll find a place of bliss and peace when we can live fully in the present moment, in the now, and let go of thinking things need to be a certain way or cravings for what we don’t have or resistance of life circumstances we are experiencing but prefer not to. fully embrace the present moment. let go of anything that is not here and now. it is not real. your thoughts of the future, past, desires, resistances, etc, etc are only preventing you from fully living today, here and now. “carpe diem” seize the day, today and every day. do not dwell upon what is not. yes, you can vision, create, and manifest your future, though you must also let go, and surrender, to the present moment of where you are now in order for the creation to manifest. if there are any hinderances in thoughts, feelings, etc, etc preventing you from experiencing that which you desire, you will be taken through those so you may fully experience and release them and create the space for what you do desire to manifest and unfold simply in your life. the more we let go, surrender, and experience, the simpler this whole process becomes. the more we let go, the simpler life becomes. and the more we let go, the simpler it becomes to perceive and understand and fully know who we truly are (and all of the seemingly magical or mystical perceptions and understandings that come with this).
life is beautiful. live it fully. today. every day. here and now. let go. embrace. live.
step outside of yourself. awaken. become aware. understand by perceiving [what is]. grow. expand. be.
here are some of the locations these were shot at (all in Pinellas and Hillsborough Counties, Florida):
Brooker Creek Nature Preserve
Canal Park
Countryside
Crystal Beach
Davis Islands
Duke Energy Trail
Dunedin Causeway
East Lake
Ed Radice Sports Complex
Fred Howard Park
Honeymoon Island
John Chestnut Park
Keystone
Lake Chautauqua Park
Lake Dan and Lake Frances Nature Preserves
Lansbrook Golf Course
Odessa
Oldsmar
Palm Harbor
Philippe Park
Safety Harbor
Selmon Expressway